
Title: Xylophone Demo
Author: Jim
Article Type: Demos
Date Published: 8/22/2021
Date Updated: NA
XP Level: Intermediate
Nodon Featured: Play Sound
Nodons Used: Play Sound, Box, Y Slide, Sphere, Game Screen, Wormhole Exit, Map, Button Press, Timer, Wormhole Entrance, Touch Position, If Touched, Digitize, Calculate X, Constant, Comparison =
Typical Time Required: 1 to 2 hours
Xylophone Demo
Finally our first Game Builder Garage demo article. In this demo we will build a virtual xylophone. We will be breaking up this demo into 4 sections.
- Graphical Elements
- Xylophone Sounds
- The Song
- The Touch Interface
Graphical Elements
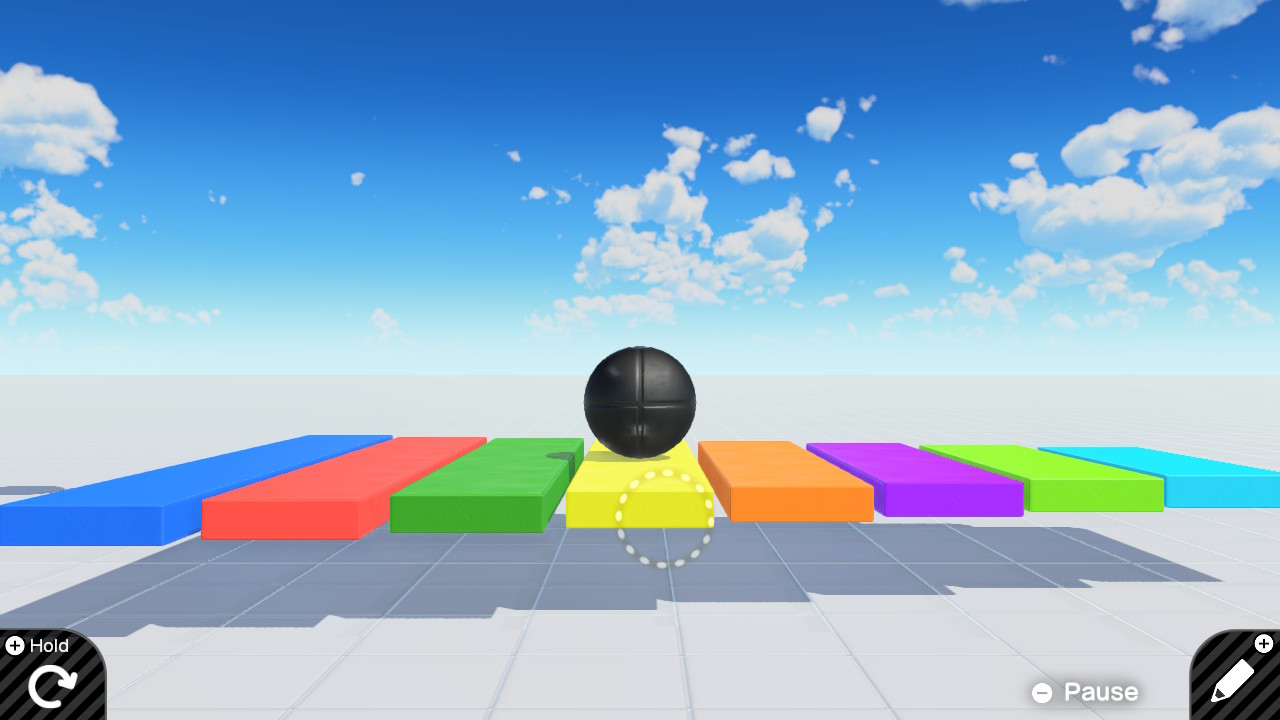
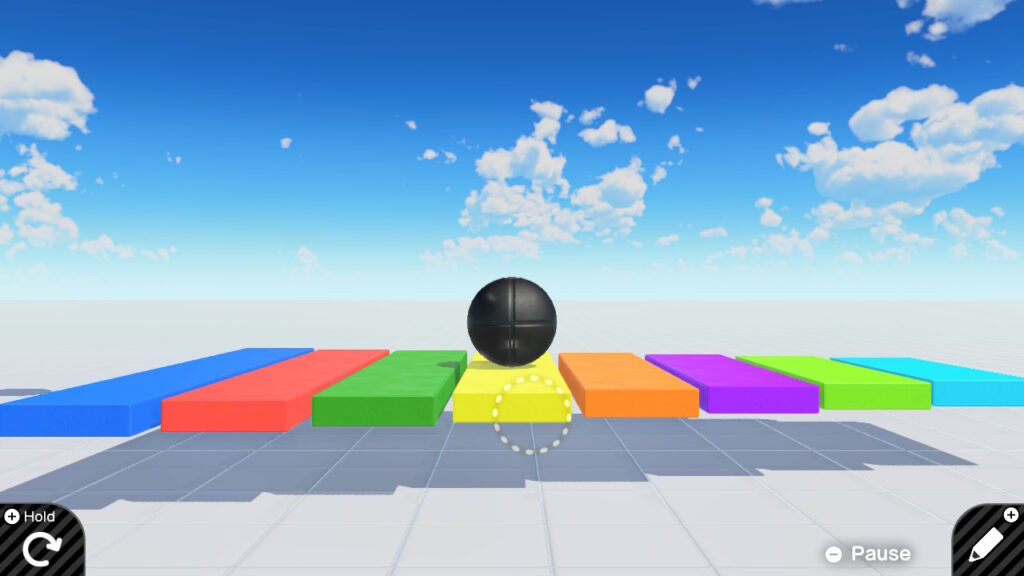
To make our xylophone more interesting there is a visual representation of an 8 note xylophone. Each key is presented by a box elongated to appear like a flattened bar. There is also a sphere used to represent the head of the mallet. I have chosen to have the mallet go out of sight at the top of the screen to simplify it’s movement. Each sphere is connected to it’s corresponding key through the use of a Y Slide connector.We will be inputting a 7 into the slide connector to cause the sphere to come straight down to strike the key. The C note will be on the far left and then moving to the right will be the D,E,F,G,A,B, and finally High C on the far right. Each key will be colored differently to evoke the spirit of a child’s xylophone. the keys also get smaller going left to right.
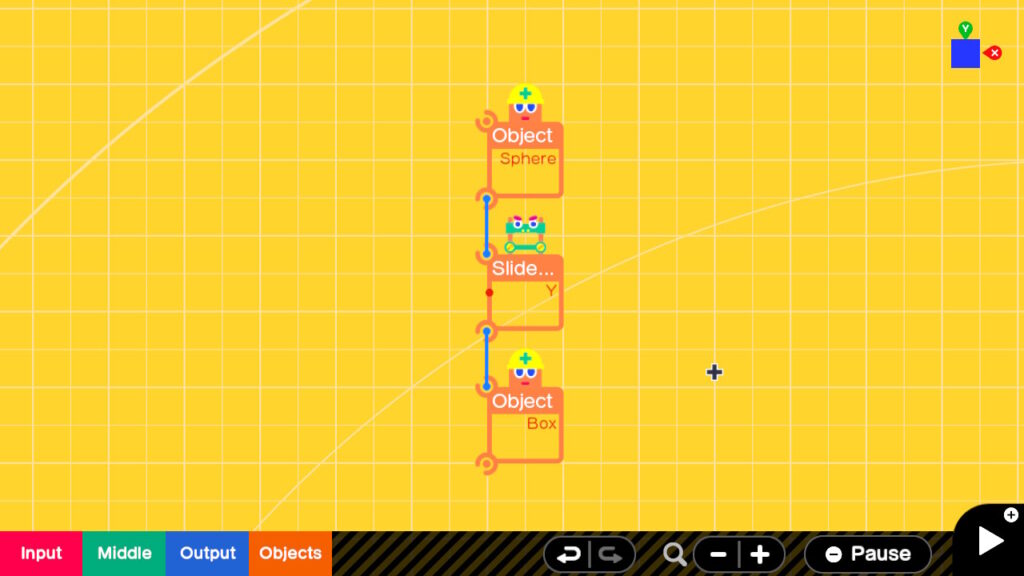
I won’t go through how each of these keys are constructed but will go through one of them and this should be enough for you to construct the rest. We will need the following three items.
Objects > Simple Objects > Box
Objects > Connections > Slide Connectors > Y Slide
Objects > Simple Objects > Sphere
Arrange the three objects as shown

Connect the Y slide to the Sphere with it’s upper connection port and the Y Slide to the Box with it’s lower connection port.
Now let’s look at the Boxes Settings.

Make sure that Movable is unselected. Un-enable Destructible and Destructive. Change the color to Blue. Change the Connection point to Y- to Y+ and finally set the size as indicated. X 0.80m, Y 0.20m, Z 5.00m. Exit out of the Settings. This will make the Box shorter so feel free to move it up closer to the Y Slide if desired.
Now for the Y Slide Settings.
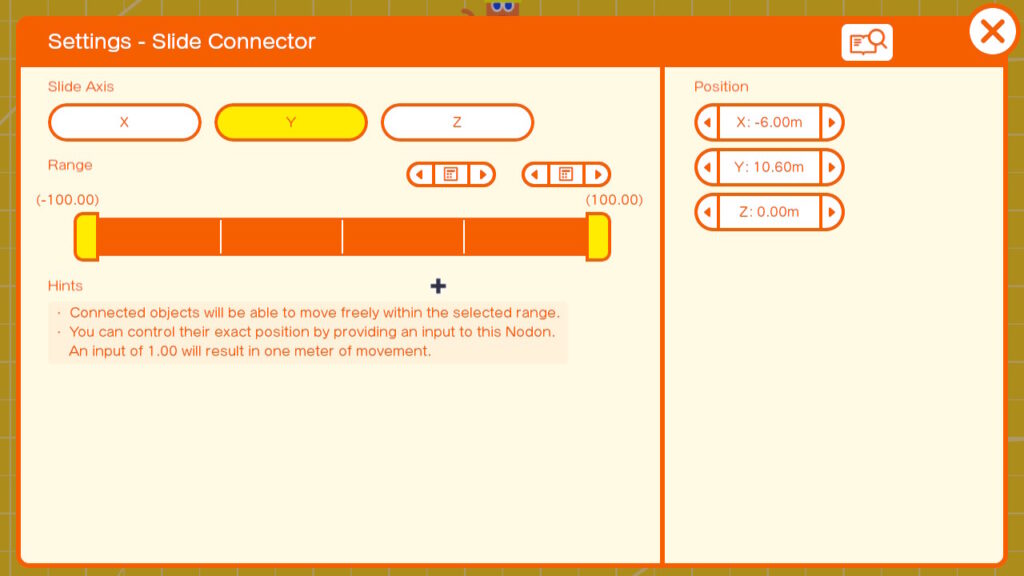
I left these settings at their default so no changes are needed.
Exit out of the Settings.
Now for the Sphere Settings.
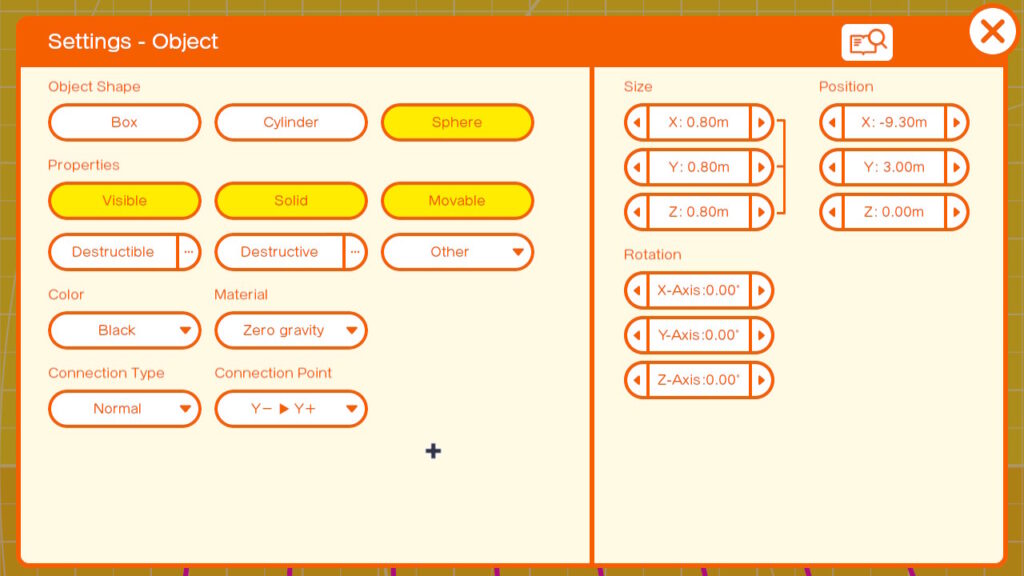
Un-enable Destructible and Destructive. Set Material to Zero Gravity. Set Connection Point to Y- To Y+. Verify that the size is set to 0.80m for X,Y,and Z, which should be the default. I also chose to make it’s color black.
That completes our 1st Key. You can select and duplicate this key to create the next key. I made the box for each succeeding key to the right of this key to be slightly less in length by 0.20m So the next key is 4.80m in the Z direction. I also chose to make each key a different color. in this example the key would be red. In this way all 8 keys can be constructed and set side by side.
You should end up with this.
Finally place a game screen so that all of the keys lie in the upper right corner like this. I also changed it’s size so that it was X 8.00m and Y 4.50m. This can be done in the Game Screen settings.
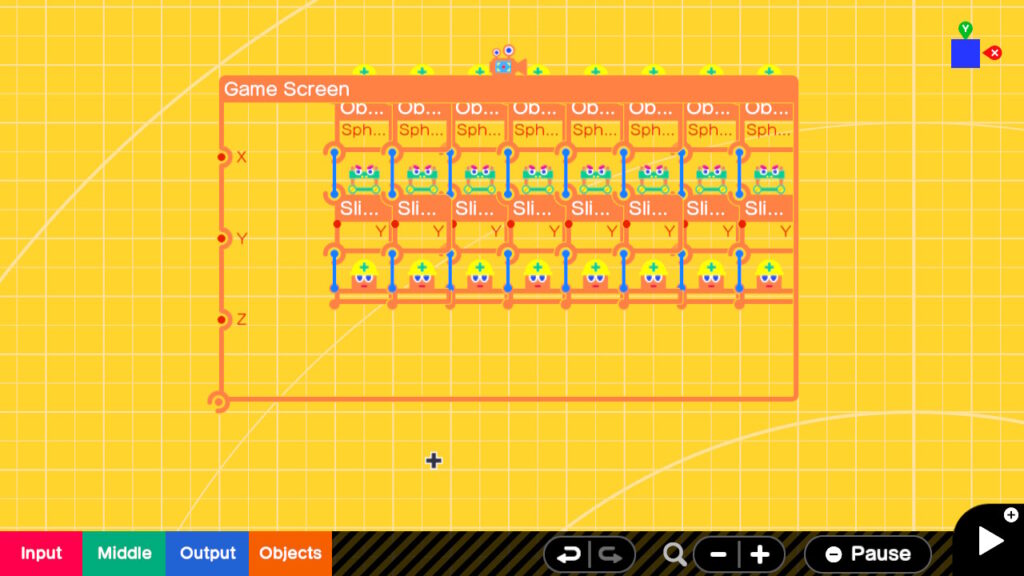
This completes the graphical elements of our demo. Feel free to use the plus button to see our xylophone. Make any adjustments to the Game Screen Nodon to get the Keys centered. Once finished get back into edit mode. Let’s start on the sound generating portion of our demo.
Xylophone Sounds
The sound generating portion our demo will consist of 8 Play Sound Nodons. Go ahead and place a
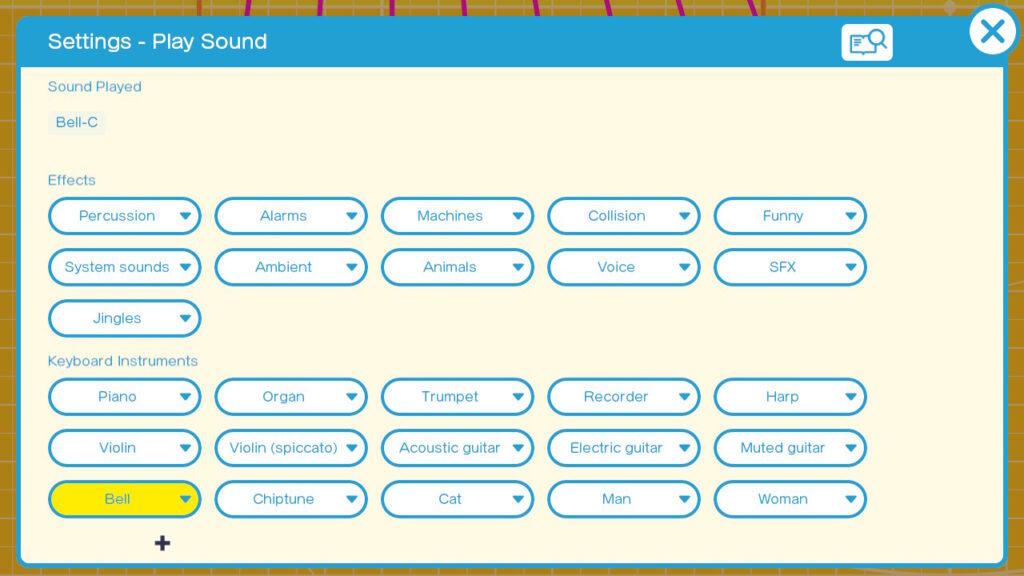
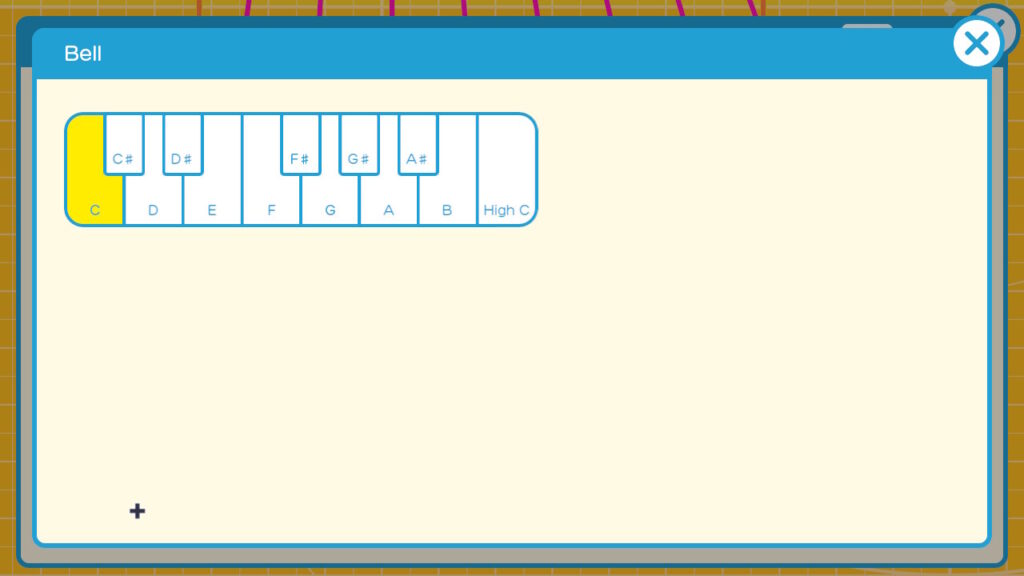
Output > Play Sound > Play Instrument Nodons. below your game screen. Leave enough room so that we can stack 2 Nodons on top of it later. Go into the settings of this Nodon. Select Bell as your instrument. Then make sure that C is selected as the note. The bell sounds most like a xylophone.
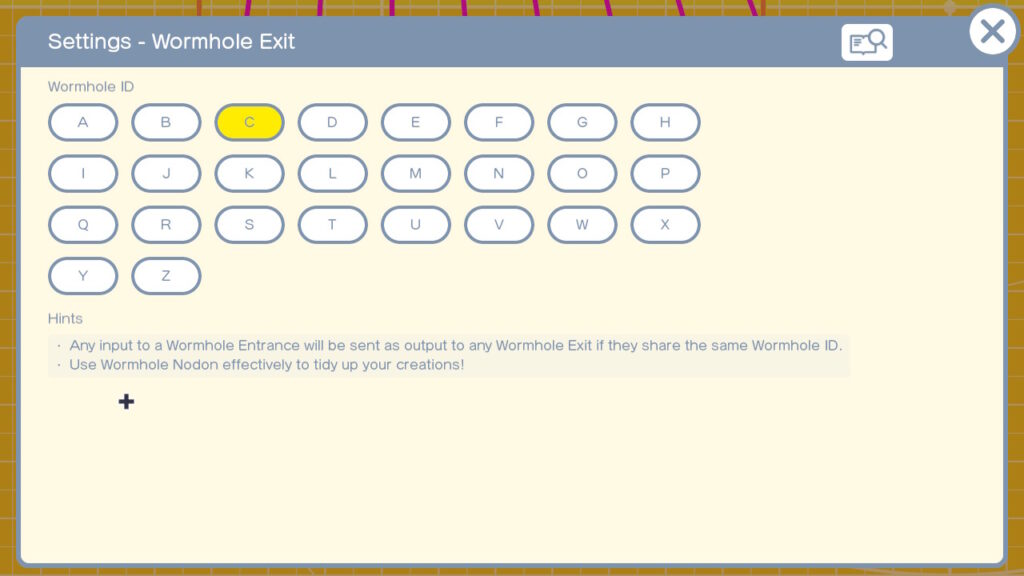
Since we will be triggering this note frequently let’s use a Wormhole Exit. This will save us a lot of connections later. The Wormhole Exit can be found at
Middle > Program Layout > Wormhole Exit
Place this right above the Play Sound Nodon. Go into it’s Settings. Set it to C. This just happens to match our Note which is also a C. This will make it easier to remember when we need to place Wormhole Entrances to play our C note.
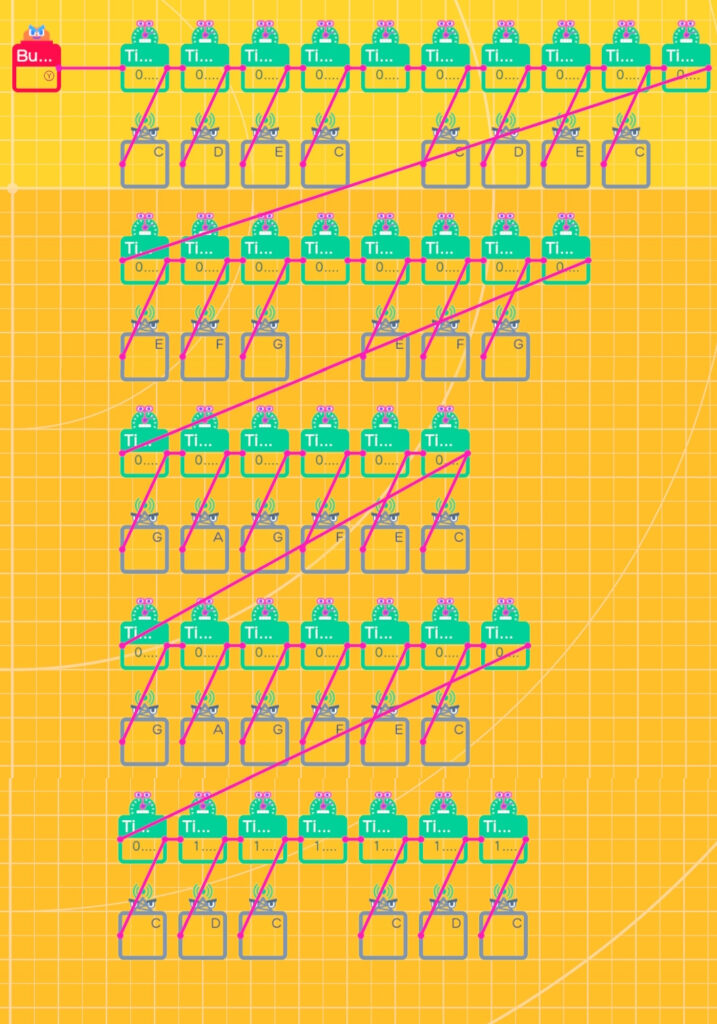
I shrunk the size of the Wormhole Exit so that you could just read the C. Connect it to the Play Sound Nodon. This is all we need to play notes, but we will also use this to trigger our Xylophone animation. For this we will place a Map Nodon above our Wormhole Exit. Go to
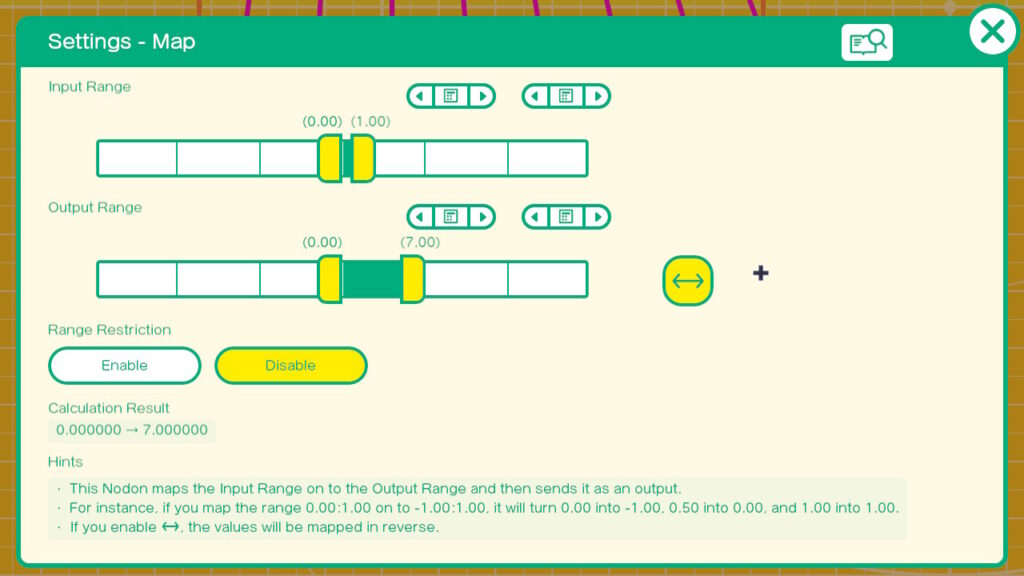
Middle > Convert > Map and place this above the Wormhole Exit. Connect the Wormhole Exit to the Map Input. Go into the Map Settings. We want to change the Input Range to go from 0 to 1. Change the Output Range to go from 0 to 7. Finally make sure to have the double ended arrow button to the right of the Output Range is enabled. This will reverse the output so that a 1 will cause a 0 to be output and a 0 will cause a 7 to be output. This will cause our Sphere to move from 7m above our boxes to 0m above the boxes. This will make it look like the Sphere is striking our Key.
Exit the Settings and connect the Output of the Wormhole Exit to the Input of the Map Nodon. We will connect the output of the Map Nodon later.
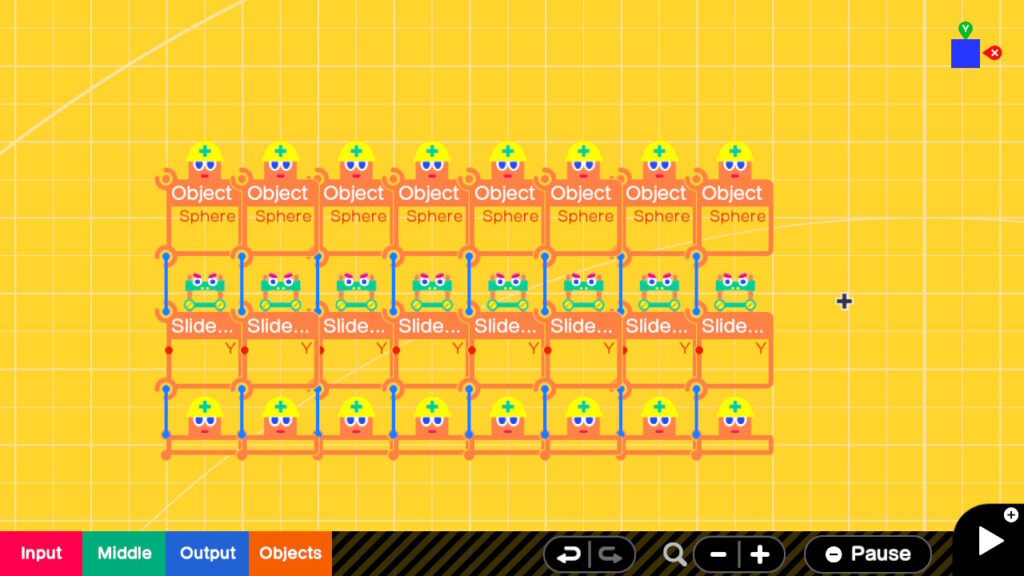
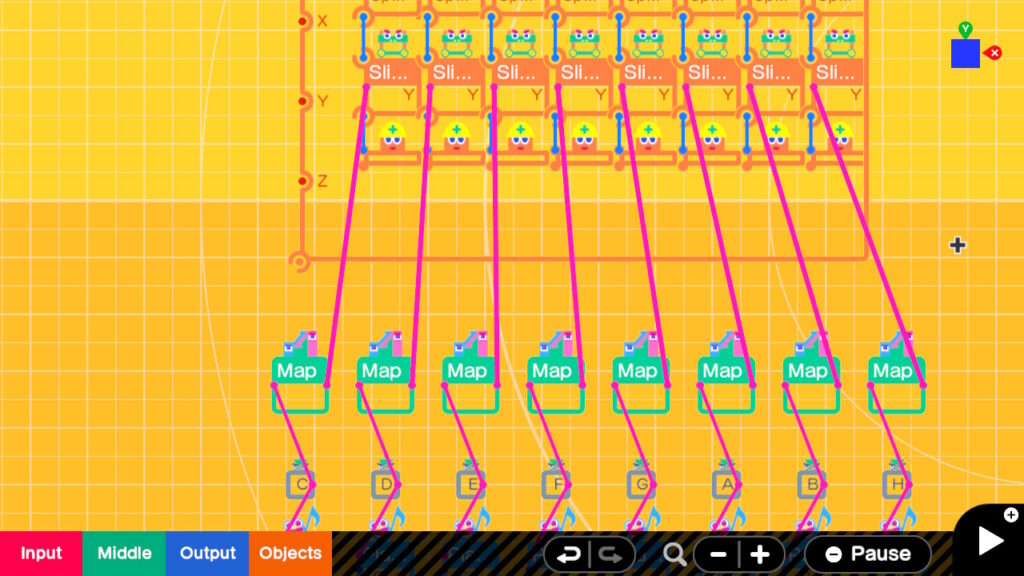
This is all that is needed to play the C note and trigger the animation. Make 7 copies of these three Nodons and lay them out as shown. From Left to right make sure that the Play Sound Nodons are set to play these notes. C, D, E, F, G, A, B, and High C. Set the Wormhole Exit IDs to match the note they are above. The last one on the right should be H for High C.
It should look something like this.
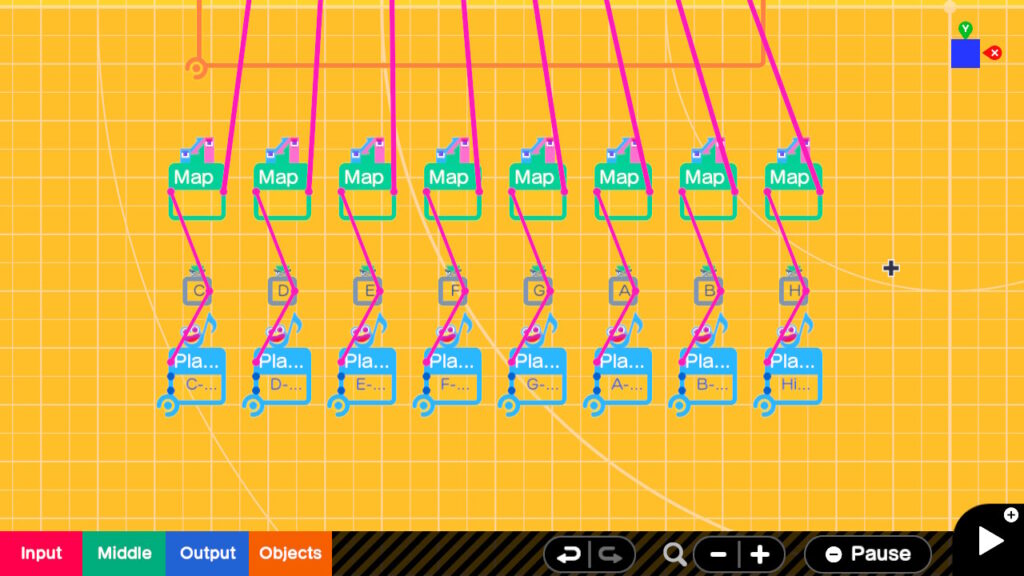
Finally we will connect the Map outputs to the Graphical elements to trigger the movement of the Spheres. Connect the Map outputs to the Slide Connector Inputs as shown.
This completes our Xylophone Sounds
The Song
We are going to have our Demo play a short tune when the Y Button is pressed. In order to do this we will need to play our notes in sequence and at the right time. We will use Timers and Wormhole Entrances to accomplish this. We will use the Wormhole IDs to direct the Timers to play the note that we want. This picture might make this more understandable.
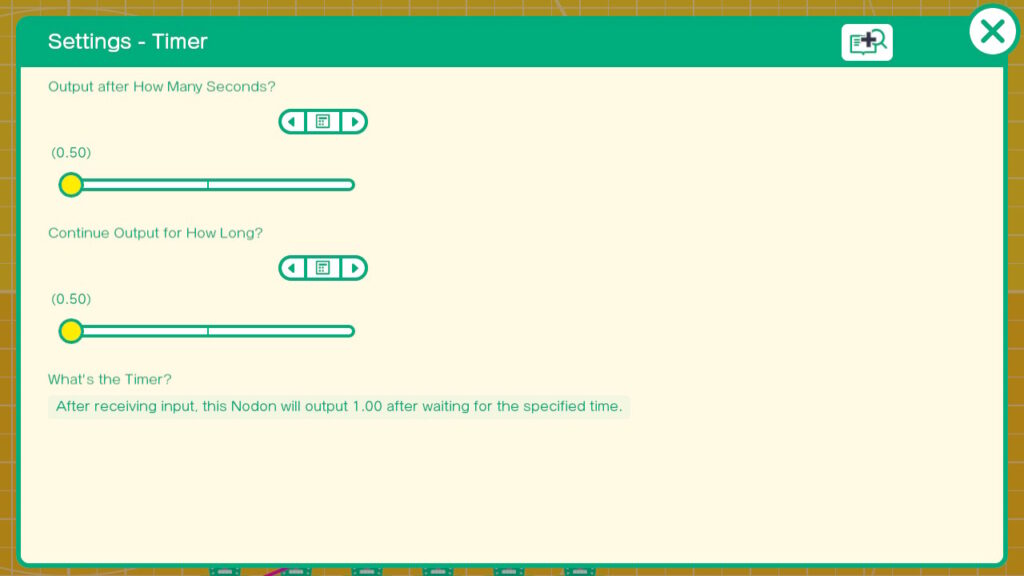
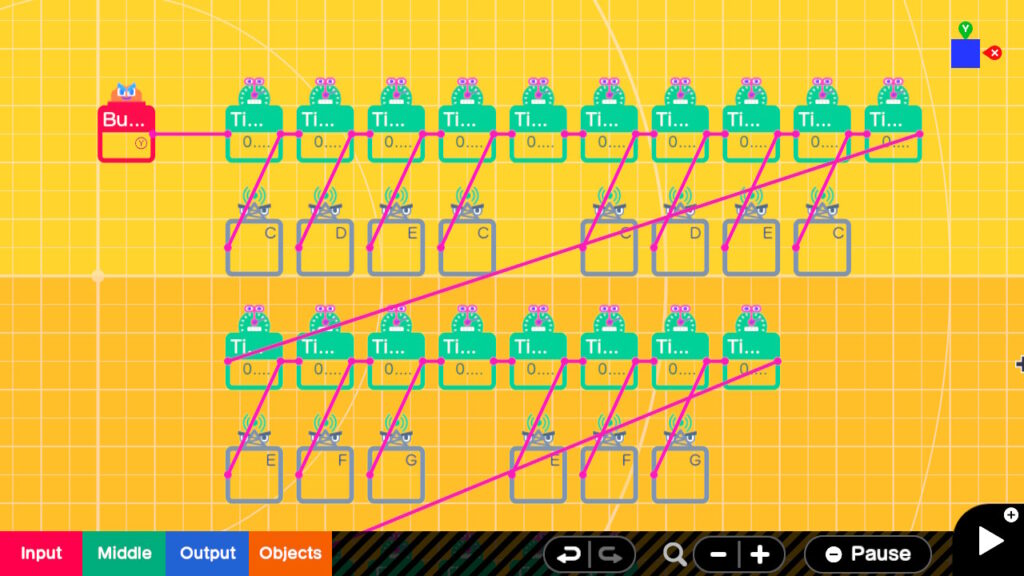
The Y button is connected to the input of the first timer. This will start the timer. After 0.5 seconds the timer will trigger for 0.5 seconds. The output of the first Timer is connected to a Wormhole Entrance with an ID of C. This will cause a C note to be played for 0.5 seconds and also trigger the animation of the Sphere striking the Box. This Timer’s Output is also connected to the Input of the new timer to it’s left. This causes the next note to be played after 0.5 seconds. This will be immediately after the first note finishes. The notes will continue to be played in sequence as each Timer is triggered. If no note has to be played such as during a rest or pause in music the Timer is not connected to a Wormhole entrance, just to the next Timer in the sequence. In the above picture this happens after the second C note is played. When it gets to the end of the row it goes to the right and down to the next row of Timers. It continues to do this until all notes are played. Here is a picture of all the rows of timers that shows all of the notes.
That my friends is the SONG. Hopefully the song is something you recognize. At this point you can use the plus button and try this out. You should see your Xylophone on screen and when you press the Y button you should hear and see our our tune being played. You can replace this song with one of your own choosing. You just need to get the notes and replace the Wormhole IDs with the ones that match your tune.
The Touch interface
Now for something really different. We will implement a simple touch interface, which will allow us to play the Xylophone directly by pressing on the keys on screen. I haven’t seen a lot of commercial games which use the touch interface on the Switch but it seemed a natural for this application.
In Edit mode scroll the screen to a clear area to the left of the Game Screen. Place a Input > Touch Screen > Touch Position in the upper right of this clear area and then place a Input > Touch Screen > If Touched Nodon just below this. I had to use both Touch related Nodons to solve an issue I ran into. I plan on having a more thorough exploration of these two Nodons in a future article. For now place a Middle > Convert > Map Nodon just to the right of the Touch Position Nodon. Just to the right of the Map Nodon place a Middle > Convert > Digitize Nodon. What we are trying to do with these 3 Nodons is convert the Output of the Touch Position to a number between 1 and 8. These will correspond to our 8 keys. The Output of our Touch Position Nodon will be between -640 to 640 on the X axis. -640 is the far left, 640 is the far right and 0 is near the center. Connect the X output of the Touch position Nodon to the input of the Map Nodon. Go into the Settings of the Map Nodon and match what we have here.
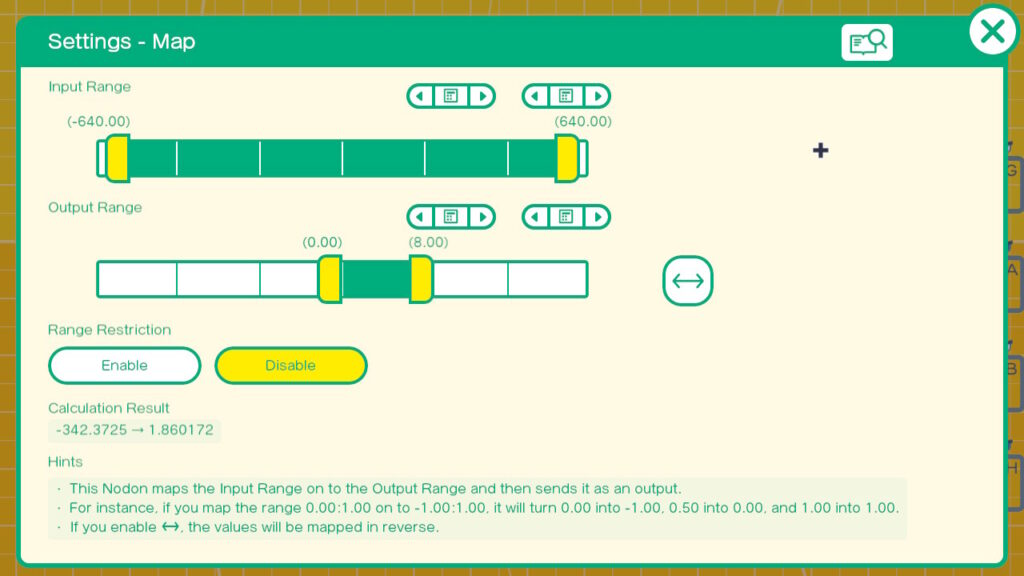
Once through exit out of the Map Nodon Settings and connect the Output of the Map Nodon to the Input of the Digitize Nodon. In the settings of the Digitize Nodon set it to 2 as shown.

Exit out of settings when complete. This will force the output into whole numbers which will be easier to compare later.
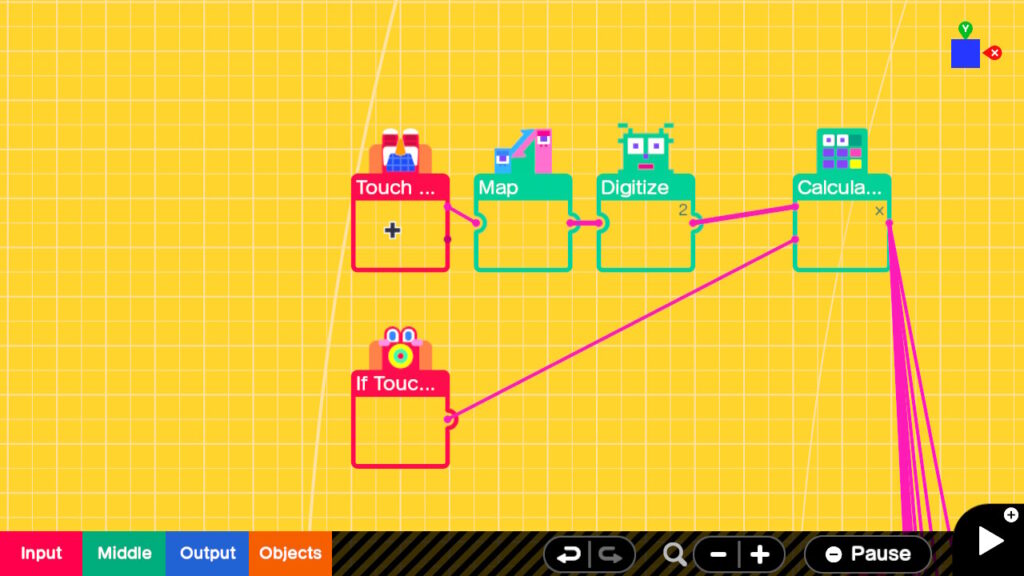
One of the issues with the Touch Position Nodon is that it outputs a number whether you are touching it or not. This was causing a note to be played when the application started and continued notes after finger was lifted. I solved this by using the If Touched Nodon and a Multiply Nodon. The If Touched outputs a 1 when touched and a 0 when not touched. By feeding the output of the Touch Position into the Multiplier and the If touched I got a 0 when nothing was touching and a number between 1 and 8 when touched.
Place a Middle > Calculate > X Nodon just to the right of the Digitize Nodon. Connect the output of the Digitize Nodon to the 1st Input of the X Nodon and the Output of the If Touched Nodon to Input 2. It should look like this. Ignore the output of the Calculate X Nodon for Now.
We have basically divided the screen into 8 touch areas horizontally. We now need to compare the numbers output so that we know which key we are touching.
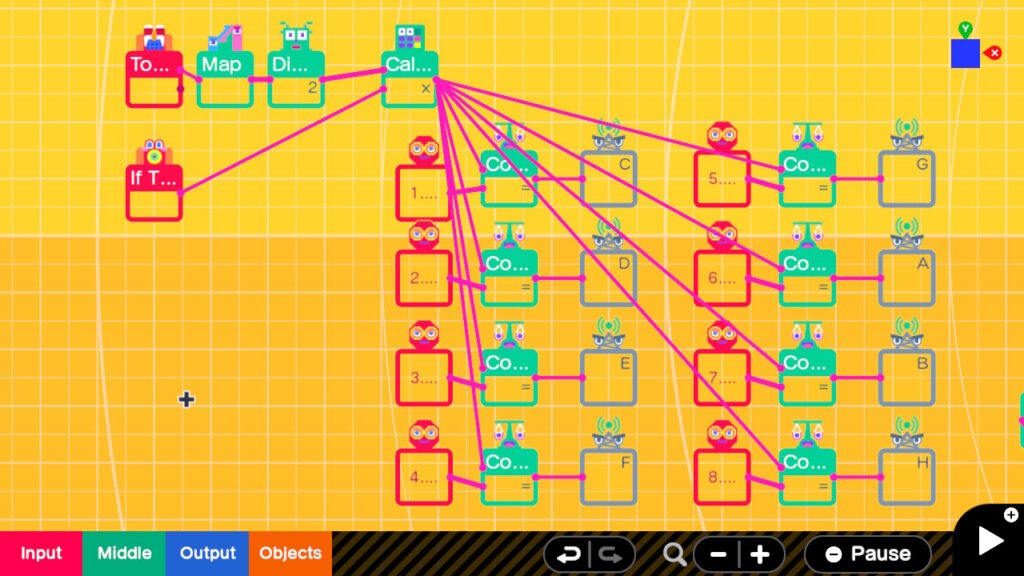
We now need a Constant or 8. Place an Input > Constant below the Calculate X Nodon. Set it’s value to 1. Place a Middle > Comparison > = to the right of the Constant. Connect the Constant to Input 2 of the Comparison = and connect the Output of the Calculaer X to Input 1 of the Comparison = Nodon. Now Place a Wormhole Exit to the right of the Comparison and set it’s ID to C. Now when we touch the far left 1/8 of the screen we will get a C note to play.
Continue by duplicating this 7 more times and compare against 2,3,4,5,6,7, and 8 with them going to wormhole exit ID’s D through High C (H) as shown.
Once complete try it out and see if you can get notes to play by touching the screen of your Switch. You will need to do this undocked and handheld. if it seems slightly off try moving your Game Screen Nodon a little left or right.
We hope you like this demo and that it inspires you to add your own tunes using the Play Sound Nodons. You may also consider how you might want to incorporate a touch interface to your next creation.
In this video finger presses are represented with dotted white circles on screen.
Summary : In this Game Builder Garage Demo we build on our knowledge of the Play Sound Nodon. We play a tune using just the notes available in this Nodon on a virtual xylophone. We also added a simple touch interface so that we can play the xylophone interactively.